This post contains affiliate links. As an Amazon Associate I earn from qualifying purchases. If you click a link and make a purchase, I may receive a small commission at no extra cost to you.
Averted vision sounds complicated. In principle, it’s about as simple as can be. In practice, it sometimes turns out to require a lot of practice and patience.
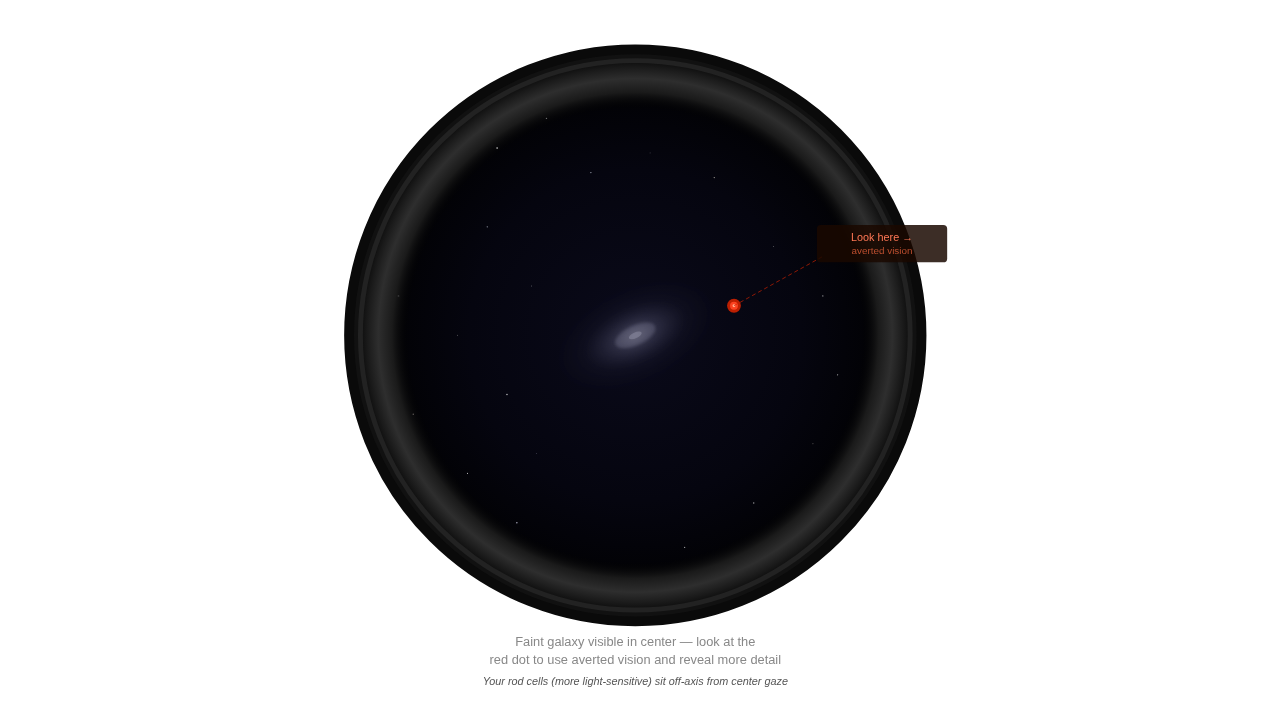
The basic idea is to look slightly away from whatever faint object you are trying to see rather than staring directly at it. This works because the edges of your retina are packed with rod cells that are far more sensitive to dim light than the cone cells concentrated at the center. By shifting your gaze just off to the side of your target, you redirect its light onto the more sensitive part of your eye — and objects that were invisible a moment ago can suddenly appear.
It sounds straightforward but it takes real practice, and some people find it harder to develop than others. The tips below will help you get there faster.
Here are eight ways to use averted vision more effectively, including one that might surprise you.
Ensure Comfort in Your Astronomy Chair
This one gets overlooked more than it should.
If your body is tense or your neck is craned at an awkward angle, you are fighting yourself before you even start. A good astronomy chair that lets you relax completely at the eyepiece makes a real difference — not just for comfort, but for the quality of what you can actually see. Relaxed eyes and a relaxed body are genuinely more effective at picking up faint detail. Do not skip this.

Relax Your Eyes
Before you even attempt averted vision, make sure your eyes are relaxed and have had time to adjust to the darkness. This matters more than most beginners realize.
Stargazing can create surprising tension — you find yourself squinting, straining, and staring harder when things are not immediately visible, which is exactly the wrong response. Tension in your eye muscles actively works against your ability to detect faint light. Take a breath, blink a few times, and consciously let your face relax before you put your eye to the eyepiece.
Dark adaptation is also a factor here. Your eyes go through two distinct waves of adjustment — the first within about five to ten minutes, and a deeper, more dramatic shift around the 20 to 30 minute mark when your rod cells fully take over.
Averted vision works best when those rods are properly dark adapted, so trying to use the technique in the first few minutes of a session is selling yourself short. Give your eyes the time they need first, then apply the technique. The combination of full dark adaptation and good averted vision practice is significantly more powerful than either one alone.
Choose the Right Telescope Eyepiece
The eyepiece you use can make a real difference when applying averted vision.
Wider field eyepieces tend to work better for this technique because they give you more sky around the object — which means more room to shift your gaze off to the side while keeping the target within the field of view. If your object is right at the edge of a narrow field, you have nowhere to look without losing it entirely.
Eyepieces in the 12mm to 20mm focal length range are a good starting point for most deep sky targets, though the right choice will also depend on your telescope’s focal length and what you are trying to see. A shorter focal length gives you more magnification but a tighter field, while a longer one pulls back and shows you more context — which is generally what you want when you are hunting for something faint.
The Orion Nebula is a good object to practice this on. It is bright enough to find easily but has faint outer regions and embedded structure that reward a wider field and a relaxed averted gaze. Try different eyepieces on it and you will quickly get a feel for how much the choice matters — the difference between a narrow and a wide field eyepiece on a target like that can be immediately obvious.

Practice, practice, practice
The core skill of averted vision is learning to look at something without looking directly at it — which feels unnatural at first but becomes second nature with practice.
Instead of fixing your gaze on the object itself, train yourself to place your focus just to the side of it while keeping it within your field of view. You are not ignoring the object, you are repositioning your eye so that its light falls on the rod cells in your peripheral vision — the more sensitive outer region of your retina — rather than the less sensitive cone-dominated center. This is what allows you to pick up faint details that direct vision misses entirely.
This takes repetition.
In the beginning your eye will want to drift back to center every few seconds — that is a natural reflex. With practice you will learn to hold the offset position comfortably and let the image come to you rather than chasing it.
The payoff is real. The Andromeda Galaxy is a good example — looking directly at it you see a bright core and a vague glow. Shift your gaze to the side and the outer arms begin to extend, the overall shape fills out, and the galaxy starts to feel genuinely large in a way that direct vision simply does not reveal.
Some objects, particularly very faint or very diffuse ones, are essentially invisible with direct vision and only appear at all through averted vision. You are not just enhancing the view — sometimes you are the difference between seeing something and not seeing it at all.
As for how far off center your gaze should be, think of it in terms of your eyepiece field of view. A good starting point is shifting your focus roughly a quarter to a third of the way toward the edge of the eyepiece from the object. Too small a shift and you are still using the less sensitive center of your retina. Too large and the object drifts toward the edge of the field where optical quality starts to fall off.
Most observers find that sweet spot somewhere in that quarter to third range, though your own eye may respond better with a slightly smaller or larger offset. The only way to find your personal sweet spot is to experiment on a known faint object and pay attention to where the object appears brightest and most defined.

Use Averted Vision in Scanning Motion
When applying averted vision, try not to lock your gaze rigidly in one spot.
Instead, adopt a slow, gentle scanning motion — moving your focus in a small circle or arc around the object rather than holding perfectly still. This works because your rod cells are actually more responsive to movement than to a static image. A faint object that seems to disappear when you hold your gaze steady can suddenly pop back into view the moment you introduce even a tiny amount of motion.
Keep the movement small and unhurried. You are not sweeping across the sky — you are barely moving at all, just enough to keep those peripheral rod cells engaged. Think of it less like scanning and more like a slow, relaxed drift around the edges of what you are trying to see.
And as with everything in averted vision, relaxation is the common thread. A tense, straining eye works against you. A soft, easy gaze that you are gently guiding rather than forcing will almost always show you more.
Consider Using an Eye Patch
An unconventional but effective tip is to use an eye patch. Covering one eye during observations can enhance averted vision by preventing the covered eye from interfering with the dark adaptation of the observing eye.
This not only reduces potential distractions from ambient light but also allows the eye you are using for observing to relax fully. By minimizing the strain on the observing eye and promoting a more focused visual experience, the eye patch becomes a simple yet powerful tool in optimizing the effectiveness of averted vision during your celestial explorations.
Know Your Target
Familiarize yourself with the celestial object you are observing. Understand its features, brightness, and location. This knowledge will help you anticipate what to look for when employing averted vision, making your observations more targeted and rewarding.
Knowing the specific details of your target allows you to focus your averted vision on the areas where faint features are most likely to be found. For example, when observing the Ring Nebula, knowing its structure and central star characteristics enhances your ability to detect subtle details using averted vision.
Concluding Your Celestial Exploration
As you embark on your celestial journey armed with the mastery of averted vision, remember that patience and practice are your celestial companions. Each observation session is an opportunity to refine your skills and unlock the secrets scattered across the night sky. Whether you’re scanning the heavens for elusive details or simply marveling at the beauty of the cosmos, averted vision opens a new dimension in your astronomical pursuits. Happy stargazing!